gitlab
GitLab介绍
GitLab:是一个基于Git实现的在线代码仓库托管软件,你可以用gitlab自己搭建一个类似于Github一样的系统,一般用于在企业、 学校等内部网络搭建git私服。
功能:Gitlab 是一个提供代码托管、提交审核和问题跟踪的代码管理平台。对于软件工程质量管理非常重要。
版本:GitLab 分为社区版(CE) 和企业版(EE)。
配置:建议CPU2核,内存4G以上。
gitlab架构
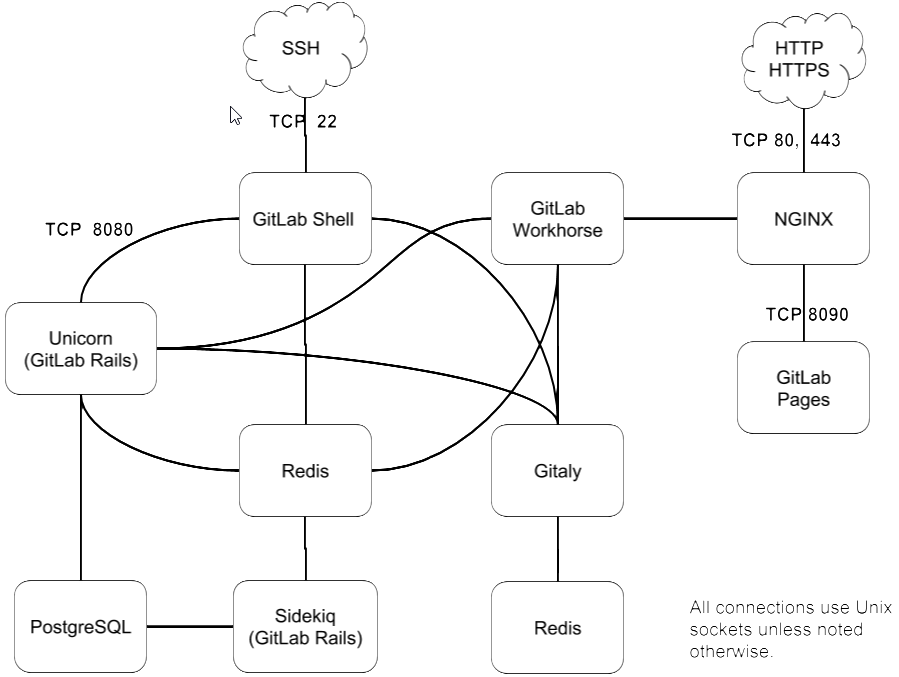 GitLab 利用 Nginx 将前端的 http/https 请求代理至 gitlab-workhorse,gitlab-workhorse 再将请求转发至 Unicorn Web 服务器。
GitLab 使用 Unicorn Web 服务器提供动态网页和 API 接口
GitLab 利用 Nginx 将前端的 http/https 请求代理至 gitlab-workhorse,gitlab-workhorse 再将请求转发至 Unicorn Web 服务器。
GitLab 使用 Unicorn Web 服务器提供动态网页和 API 接口
- Nginx:静态web服务器。
- gitlab-shell:用于处理Git命令和修改authorized keys列表。(Ruby)
- gitlab-workhorse: 轻量级的反向代理服务器。(go),会处理一些大的HTTP请求,比如文件上传、文件下载、Git push/pull和Git包下载。 默认情况下 gitlab-workhorse 与前端之间的通信是使用 unix domain socket 进行的,unix domain socket实现了高效的本地通信。 但也支持 TCP 转发请求。
- postgresql:数据库。
- redis:缓存数据库。
- sidekiq:用于在后台执行队列任务(异步执行)。(Ruby)
- unicorn(GitLab Rails):一个http服务器,类比java的tomcat。 主要处理动态网页和 api 接口, 这个gitlab的web应用都由Gitlab Rails处理。使用 Unicorn 的原因是: Unicorn 能为 Rails 应用提供并发处理客户端请求的能力, 并且提供了更强的容错处理
gitlab-ctl的常用命令
//启动
gitlab-ctl start
//重新启动
gitlab-ctl restart
//查看运行状态
gitlab-ctl status
//停止
gitlab-ctl stop
//查看日志信息,默认日志目录:/var/log/gitlab
gitlab-ctl tail
// 拉取/var/log/gitlab下子目录的日志
sudo gitlab-ctl tail gitlab-rails
//保存配置
gitlab-ctl reconfigure
gitlab安装和启动
安装依赖
yum install curl policycoreutils openssh-server openssh-clients policycoreutils-python
//如果没有启用ssh,启用ssh
systemctl enable sshd
systemctl start sshd
//安装邮件服务
yum install postfix
//启用邮件服务。
systemctl enable postfix
systemctl start postfix
在启用邮件服务postfix的时候,有可能会出现send-mail: fatal: parameter inet_interfaces: no local interface found for ::1
的端口错误,解决方法是修改配置文件/etc/postfix/main.cf。
将:
inet_interfaces = localhost
inet_protocols = all
改成:
inet_interfaces = all
inet_protocols = all
使用wget获取安装包
wget https://mirrors.tuna.tsinghua.edu.cn/gitlab-ce/yum/el7/gitlab-ce-11.9.0-ce.0.el7.x86_64.rpm
在清华开源镜像站找到较新的版本下载。
安装下载的软件包
rpm -ivh gitlab-ce-11.2.3-ce.0.el7.x86_64.rpm
修改配置文件
Gitlab的配置文件目录为/etc/gitlab/gitlab.rb。对该文件进行一些必要的配置。运行 gitlab-ctl reconfigure后,配置会被加载到各个安装目录中。
//外部访问url,最好是子域名,,主要影响内嵌nginx的配置。也可以配置为ip:port格式
external_url 'http://git.DOMAIN.COM'
最简化安装
Gitlab最简单的安装就是直接运行配置,然后重启。
gitlab-ctl reconfigure
gitlab-ctl restart
访问该主机的ip地址(默认80端口),直接可以访问到gitlab主页,但是通常会进行一些自定义处理。
配置自己的nginx(可选)
Gitlab自带内嵌的nginx作为静态web服务器,通常情况下,我们服务器都会自己安装nginx,为较少资源的消耗,我们可以关闭内嵌的nginx,让gitlab使用我们自己安装的nginx。
- 编辑【/etc/gitlab/gitlab.rb】文件 ``` #vi /etc/gitlab/gitlab.rb
#反向代理和gitlab不在同一台机器时配置。 gitlab_rails[‘trusted_proxies’] = [‘192.168.0.22’]
#unicorn监听地址及端口,默认是8080,会和tomcat的端口冲突,最好改为其他端口 unicorn[‘port’] = 8081
#gitlab 默认的用户是git和gitlab-www,该选项配置默认的外部用户,在使用自建nginx时,该选项必须包括nginx配置文件中的user。 web_server[‘external_users’] = [‘web’]
#关闭自带nginx nginx[‘enable’] = false #内嵌nginx监听的配置,默认为80。当使用内嵌nginx时使用。 #nginx[‘listen_port’]=8100
- 配置 nginx

在nginx中对gitlab进行配置,参考自带nginx生产的配置,目录为:
`/var/opt/gitlab/nginx/conf/`
Nginx 配置文件中的user需要添加到gitlab配置文件中的`web_server['external_users']`,避免访问权限问题。

- 完成后重启nginx和gitlab。
gitlab-ctl reconfigure gitlab-ctl restart nginx -s reload
- 端口开放、权限、防火墙配置,根据实际情况具体操作。
- 首次进入需要设置密码。默认用户名是root,密码设置复杂一些。

#### 内存配置
gitlab运行很占用内存,占用内存的主要进程有unicorn worker和sidekiq。通过在gitlab配置文件中修改相关配置,可减小一定的内存使用:
unicorn默认工作进程数为cpu核数+1,最小为2。
unicorn[‘worker_processes’]=2
工作进程的最大和最小内存。默认为400和650,可适当减小。
unicorn[‘worker_memory_limit_min’]=”2001«20” unicorn[‘worker_memory_limit_max’]=”3001«20”
sidekiq为工作队列,默认为25,可适当减小。
sidekiq[‘concurrency’]=4
数据库最大并发,适当减小
postgresql[‘max_worker_processes’]=4
数据库缓存,设置为256M。
postgresql[‘shared_buffers’]=”256M”
#### 配置信息
在运行gitlab-ctl reconfigure后,会根据/etc/gitlab/gitlab.rb生产配置文件。配置信息在/var/opt/gitlab下,主要的配置文件目录如下:

* 版本信息
cat /opt/gitlab/embedded/service/gitlab-rails/VERSION
* nginx配置

nginx配置文件(内嵌版,使用外部nginx不会生产)
/var/opt/gitlab/nginx/conf/gitlab-http.conf
#### 启动配置

禁止用户注册:root用户登录->Admin area->settings-> Sign-up restrictions->sign up enable去掉勾选。

访问权限:root用户登录->Admin area->settings->General-> Visibility and access controls->

#### 碰到的错误
客户端使用git操作服务器时,报错
unable to access ‘https://**’: SSL certificate problem: Invalid
因为有些服务器是https是自签名的. 所以在命令行上运行下面代码,将安全验证关掉
git config –global http.sslVerify false ```